mila+cuatro recently opened a Felt store. It no doubt slipped under the radar of most of the world but I'm pleased to announce that we have already made a sale - and to a complete stranger at that!
10% of the sale price (excluding shipping) of items sold in the mila+cuatro Felt store will be donated to Sands (the Auckland Central branch). Sands is a charity that supports bereaved parents who lose a child close to birth. Through Sands I have had the opportunity meet other unfortunate souls for whom every parent's worst nightmare is their reality - Sands has helped me enormously and I would love to think that my crafting can in some way help someone else.
A challenge to any other crafty types out there - why not pick a charity and donate a percentage of your sales to a good cause?

Wednesday, 29 June 2011

Old nana's nightie refashion
My husband was not impressed when I came home from the op shop with this:

The photo doesn't do it justice: it's huge, it has lovely lace trim, and some special embroidery bits. Obviously I'm not going to be wearing this anytime soon, but I thought the fabric would look so cute as a top for Ruby, so I chopped it up and whipped up a little popover.
 If this looks familiar to anyone then it either means that a) this used to be your nightie, or b) you've read my post about the first dress I made Ruby. I used the same pattern that I made for that dress but just chopped it off shorter, I also took it in a little at the sides.
Here is a little closeup of the fabric:

You can imagine how cute this looks on her. For those who can't imagine, here is a photo:
 I want to make a dress with pleats in it for Ruby but was having a hard time working out how to factor pleats into the pattern (I have a self imposed rule of creating my own patterns). Then I happened upon the Pleat section in my sewing encyclopedia which said that you can actually put the pleats into the fabric before cutting it up - what a revelation! So I practiced with this popover. I painstakingly put itty bitty pleats into the fabric because I wanted pleats on the front of the popover.
Then, annoyingly, while I was pressing the seams after stitching the popover together my iron ruined my best laid plans. Something is stuck to the bottom of my iron and it just got too hot and melted either the fabric or whatever is stuck to the bottom of the iron.
All was not lost though ... in my quest to avoid bias binding after having such a nightmare with Lola's neckline and armholes, I had made it reversible, so the pleats are on the inside and this nana's nightie lives to see another day.

The photo doesn't do it justice: it's huge, it has lovely lace trim, and some special embroidery bits. Obviously I'm not going to be wearing this anytime soon, but I thought the fabric would look so cute as a top for Ruby, so I chopped it up and whipped up a little popover.

Here is a little closeup of the fabric:

You can imagine how cute this looks on her. For those who can't imagine, here is a photo:

 |
| Itty Bitty pleats |
 |
| Iron Carnage |
All was not lost though ... in my quest to avoid bias binding after having such a nightmare with Lola's neckline and armholes, I had made it reversible, so the pleats are on the inside and this nana's nightie lives to see another day.
Tuesday, 28 June 2011
Zip It!
This morning I was debating whether I should head off to Spotlight to buy a zip to make one of the things on my Pinterest board but decided against it. Instead I visited my local op shop and was pretty pleased to find a stash of zips still in their original packaging. Some of them are pretty old, I'd go so far as to call them vintage.


Saturday, 25 June 2011
Oilcloth starter
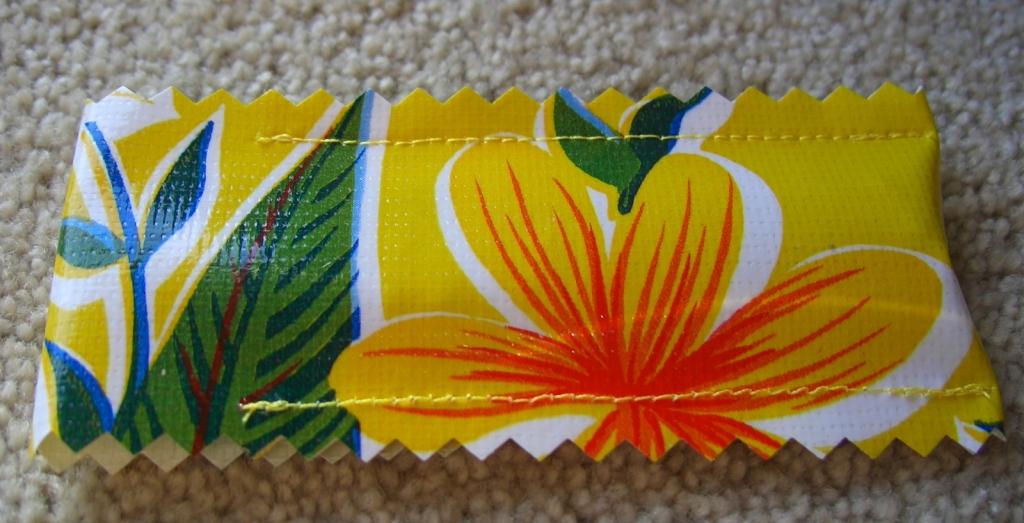
Just finished my first oilcloth project, a little something to get used to working with oilcloth. I'm glad I started small, as there are a few things you need to know before embarking on an oilcloth project:
1) You can't use a normal foot. I bought a non-stick (teflon) foot. I read somewhere that you can try putting masking tape on your normal foot.
2) You can't use pins, you also wouldn't want to be doing any unpicking - needles and pins leaves holes in the oilcloth. I used wooden pegs.
3) You can't use an iron to press it. Finger pressing is a good option.
4) You need heavy duty machine needles.
5) You probably need to play around with your tension. (I didn't do this - you'll be able to tell that from the photos)
These are things I didn't know when I purchased my oilcloth.
So what did I make? A case for my thread cutter. Until today my thread cutter lived in the ugly packaging it came in, too dangerous to leave naked in my sewing kit.
 Yes, I have yellow velcro. Found it in an op shop and just knew it would come in handy. There were other colours as well and I'm kicking myself for not buying them.
 After I took the photos I decided to add a piece of felt on the fold where the blades hit the oilcloth. The stiching is really obvious on oilcloth, certainly on this yellow one anyway. I needed to adjust the tension on the sewing machine, but was too lazy - I'll pay particular attention to this on my next project.
1) You can't use a normal foot. I bought a non-stick (teflon) foot. I read somewhere that you can try putting masking tape on your normal foot.
2) You can't use pins, you also wouldn't want to be doing any unpicking - needles and pins leaves holes in the oilcloth. I used wooden pegs.
3) You can't use an iron to press it. Finger pressing is a good option.
4) You need heavy duty machine needles.
5) You probably need to play around with your tension. (I didn't do this - you'll be able to tell that from the photos)
These are things I didn't know when I purchased my oilcloth.
So what did I make? A case for my thread cutter. Until today my thread cutter lived in the ugly packaging it came in, too dangerous to leave naked in my sewing kit.

Subscribe to:
Posts (Atom)
