Friday 20 December 2013

A granny on the bed

Ruby's quilt is finished!  We love it.


The Autumn Blooms quilt back from A Bright Corner was the inspiration for the back and I included a strip of scraps that Ruby and I had sewn together.  It's definitely a reversible quilt, we love both sides.  The scrappy strip is project 19 of Scraps 101.


The quilting ended up being such a chore - I wanted the negative space to be more densely quilted than the blocks, which I outline quilted.  I decided on diagonal lines spaced about an inch apart, but which didn't cross over the coloured squares in the outline quilted blocks.  It took me aaaaaaages, stop start stop start.  I was so pleased to have it finished.

Back showing quilting

Ruby loves it, so its a huge success.  The Lorax is still my favourite.


Linking up to:
Finish it Up Friday at Crazy Mom Quilts
TGIFF - hosted this week at Gingersnaps Quilts
Can I get a Whoop Whoop

Wednesday 18 December 2013

WIP Wednesday: Basting and backing questions


I basted Ruby's quilt last week and have two questions for quilters out there:

1. Do you baste beyond the top?  I usually baste to the edge of the quilt top, but recently wondered whether perhaps I should baste the back and batting together where they extend out past the quilt top.

2. Do you cut the selvedges off your backing?  I decided not to cut the selvedges off when making Ruby's quilt and this seemed cute smart because a) it meant less work, and b) it saved some fabric.  But I thought maybe there's a reason it should be cut off, like it may affect the give of the backing or something???  The selvedges end up being cut off with all the excess when binding of course, but I was hoping to cut down on some wastage. 

I've been having a little fun with some improv quilting, here's a sneak peak:


Apart from making my husband's cake and basting quilts, here's some other happenings from around here:


I'm picking lovelies like these fresh from the garden at the moment, usually they don't last long enough to be photographed as Ruby and Pepper-Mae eat them straight from the garden but these ones cried out to be shared with the world.


This is my husband's biggest WIP - building a chicken house. We picked up 6 point of lay pullets on Monday, but their house isn't quite ready so they're a bit crowded in a little A frame coop, this is the poultry equivalent of living in a caravan while your dream house is being built. 

Note the lack of Christmas sewing.  One week to go and apart from a superhero cape for Ruby I have yet to make any Christmas gifts.

Linking up to:
WIP Wednesday at Freshly Pieced

Race Track Cake: Scraps 101

My husband's birthday cake:


The chequered flag is a scrap piece of black/white dot fabric glued onto a craft stick, the bunting is scrap felt pieces sewn onto bakers twine - which make this project 18 of Scraps 101.


Saturday 14 December 2013

Scrappy cuffs and epaulettes: Scraps 101

A cuff for me and a cuff for my sister.  The scrappy patchwork one is fastened with domes/snap fasteners, which are more practical because then it can be reversible.  I used scrap interfacing, leftover pieces of binding and some other scraps from my scrap bin as well as a charm from the lovely little pack I won from Sarah.


And I made some epaulettes for a was-I-shopping-with-my-eyes-closed shirt, hoping to turn it into an edgy casual shirt.  Epaulettes may not be the correct term but you get the idea.  I hope.  To be honest the epaulettes didn't really have the effect I was hoping for, but there you have it - a scrap project nonetheless.  I didn't even bother to match my thread.


The cuffs are projects 15 and 16 of Scraps 101; the epaulettes are project 17.


Linking up to:
Sew Cute Tuesday at Blossom Heart Quilts

Giveaway Day winner

Wobbly bobbin's weekend is about to get a whole lot more exciting, the random number generator picked her to win my Sew Mama Sew giveaway, yay for wobbly bobbin!


Monday 9 December 2013

Scrappy Wrapping: Scraps 101

Some scraps, brown paper, glue and a sewing machine led to these ...


These are project 14 of Scraps 101.


Linking up to:
Fabric Tuesday at Quilt Story

Giveaway Day - $30 at Fat Quarter Shop!


*** THIS GIVEAWAY IS NOW CLOSED ***

Hello Sew Mama Sew readers!  Welcome to my blog.  I love making things and sharing them with the world, at the moment I'm mostly into kid's craft, sewing and quilting.  I'm also really motivated to use up scraps so you'll see various scrappy projects if you check out my Scraps 101 series.

Now, for the giveaway, I'm giving away a $30 gift voucher for the Fat Quarter Shop - awesome!
To be in for a chance to win, all you need to do is leave me a comment here, letting me know which of my Scraps 101 projects you like the best so far.  Followers of my blog (new and existing) get an extra entry, so if you follow my blog leave me another comment here letting me know how you follow.  This is open to everyone, regardless of where you live.

The giveaway will stay open until around about 2pm, on Saturday 14 December 2013, when I'll use random number generator to select a winner.  Good luck!

Bow Hairtie Remix: Scraps 101

Using my Bow Hairtie Tutorial but instead of tying the bow onto a hairtie, I knotted the bow onto a headband ...


and then made a brooch by knotting it on a safety pin. Headband is project 10 of Scraps 101; brooch is project 11.


Also, I made some similar hairties but instead of knotting them I gathered through the middle and sewed on a button.  Cute!  These two are projects 12 and 13 of Scraps 101.


Friday 6 December 2013

Remembrance Book Bag Tutorial

This article appeared in a recent edition of the Sands Auckland Central 'Expressions' magazine. 
 

We received remembrance art from Melody Art & Designs and I wanted to do something other than just have it on our wall.  This is one of the things I have done with it – a very simple remembrance book bag.  My finished bag measures approximately 28cm wide x 34cm long.

You will need:
  • ½ metre outer fabric (white or light-coloured, 100% cotton -I used bleached calico)
  • ½ metre lining fabric (I used different fabrics for lining and straps, but can just use the same fabric for both)
  • Electronic remembrance art image
  • Iron-on T-shirt transfer paper (I used Avery T-Shirt Transfer Paper from Warehouse Stationery)
  • Sewing machine
  • Basic sewing supplies (needle, matching thread, scissors, etc). 
What to do:
1.  Print the remembrance art onto the T-Shirt Transfer paper, remembering to print as a mirror image.  Set aside to dry.

2.  Cut the following from both your outer fabric and lining fabric:
·         One 70cm x 30cm piece (for the bag)
·         Two 70cm x 5cm piece (for the straps)

3.  Fold outer bag piece in half right-sides-together, pin and sew along the sides using a 1cm seam allowance.  Repeat for lining bag piece.  Press seams open.

4.  Form a 90o angle at the base of each seam of the outer bag, so that the seam is running at 45o angle (take a look at the photo below).  We will be making a gusset by stitching perpendicular to the seam.  Mark 4cm in on each side of the point then stitch across to form a triangle.  Back stitch for extra strength.  Cut off the triangle.  Repeat for both side seams of the outer and the lining.


 The base corners of your outer and lining will now look like this
5.  Turn top raw edge of outer 1cm over to the wrong side of fabric to create a hem and press.  Repeat for lining.

6.  Take one outer strap piece and one lining strap piece and place right sides together.  Pin and sew along each long side using 5mm seam allowance.  Turn right side out (using a chopstick or wooden spoon handle can help).  Press straps flat and topstitch along each edge.  Mark 2cm in from each end of the straps with tailor’s chalk.

7.  Turn outer bag right side out.  Place lining inside outer, matching seams and lining up the pressed hem.  Pin together.  Take one strap and pin strap between outer bag and lining, so the edge of the strap is 4cm in from side seam, the other end of the strap should be 4cm in from the other side seam.  Line up the 2cm line drawn in step 6 with the top of the bag (see photo below).  Starting at one seam, stitch all the way around top of the bag, backstitching at start and end.
8.  Reinforce strap attachment point.  I do this by sewing a square with an X as in the photo below.
 

9.  Trim remembrance art to remove excess white space.  Follow manufacturer’s directions to transfer image to the front of the bag.

You’re finished!  Now fill it with books and wear it with pride – show the world that your baby counts.
 
Linking up with:
Finish it up Friday at Crazy Mom Quilts
TGIFF hosted this week at Quokka Quilts
Sew Cute Tuesday at Blossom Heart Quilts 

Wednesday 4 December 2013

WIP: Scrappy Bits & Bobs


If you're new or haven't visited for a while, you may not have read about my Scraps 101 Series - I'm making 101 things out of scraps (or partly out of scraps), inspired by Crazy Mom Quilt's current 101 Scraps project.  Here are a couple more Scraps 101 projects as well as some other random WIP bits and bobs.

Scrappy tomatoes ... my tomatoes will need staking soon, I've completely forgotten to pinch out the laterals so they're a bit unruly.  I'm tying them to the stake with selvedge scraps and long strip scraps from squaring up fabric - this is project 8 of Scraps 101.  

Some of you will remember the Sewing Card activity I tried with Ruby - the other day she asked to do it again, I suggested a butterfly but she wanted to do another house.  I punched the holes, threaded the blunt needle and handed it over.  I told her which holes to put the needle through and she did the rest.  She managed this much of it, and we'll pick it up again another day.  So proud of her, that's a pretty good fine motor skill workout for a 3 year old (those are her hands in the photo).

Also, Ruby is making quilts out of lego!! (She calls them quilts, might not be too cosy for her dolls to snuggle under though)  So my recent doll's quilt inspiration has come full circle.

One of my WIPs is a festive lap quilt which has blocks framed in different colours.  I used some selvedge scraps pinned to the blocks so I wouldn't forget which colour to frame the blocks in.  Project 9 of Scraps 101 - and a very handy idea that I'll use again.

A couple of the trees on our town's main street are in bloom at the moment:

Finally, I'm busy getting giveaways ready for Sew Mama Sew's Giveaway Day - so be sure to come back here on December 9.  That's a slice of my life at the moment, what's happening in yours?


Linking up with:
WIP Wednesday at Freshly Pieced

Sunday 1 December 2013

Playing Postie: Scraps 101

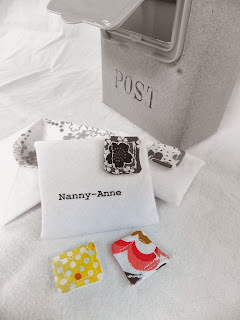
This activity was inspired by this post from El Hada de Papel.  After seeing the envelope clutch at See Kate Sew a while ago I put the two ideas together and came up with this, a cardboard box with the flap from a baby wipes packet as a postbox and fabric envelopes and stamps:


If you have young children you can imagine how much fun they have with this.  I didn't use Kate's pattern, I made my own; and after a bit of trial and error I also constructed the envelopes differently.  The stamps are stuck on with velcro, so they can be pulled off and on, I also added names to some of the envelopes, using iron on t-shirt transfers.  This is great for using up scraps!  The envelopes and stamps are project 6 and 7 of Scraps 101.


Linking up to:
Made by You Monday at Skip to My Lou
Sew Cute Tuesday at Blossom Heart Quilts
Fabric Tuesday at Quilt Story  
Tuesday Tots at Rainy Day Mum
Finish it up Friday at Crazy Mom Quilts 

Friday 29 November 2013

Building Blocks Doll quilt : Scraps 101


Is anyone else inspired by the colours of their kids' lego blocks?  A couple of lego towers Ruby had left lying on the carpet gave me the inspiration for a quilt so I thought I'd try it out using the brown bag technique. 

I took some of the small blocks, matched them to solid scraps from my scrap stash then put the lego blocks in a brown bag and drew them out at random to make two towers, one taller than the other.  I wanted the quilt towers to be the size of the real towers, so the scraps are quite small - they were 1 3/4 inch x 1 and 1/4 inch before piecing.  The background white is scrap pieces left over from Ruby's quilt.


Front and back have two towers, vertical towers on the front and horizontal on the back.  I quilted around the towers (front and back), then added quilted towers of varying length in the negative space.

Front (left) and Back (right)
Good view of the quilted towers
If I make one like this again I'd have more towers and have them stacked at angles like in the photo at the top of this post, to make it a bit more interesting.  This is project 5 of my Scraps 101 series.


Linking up to:
Finish It Up Friday at Crazy Mom Quilts
TGIFF
Can I Get a Whoop Whoop at Confessions of a Fabric Addict
Made By You Mondays at Skip To My Lou 


Related Posts Plugin for WordPress, Blogger...