Our daughter’s fourth anniversary is coming up and I wanted to make something to give to our family when we celebrate her day, so I made some Christmas ornaments that have her handprint on the front and some bright fabric on the back. I felt a real connection to Mila while I was making these; when I was holding a finished one in my hand I felt like I was holding Mila’s hand again.
Although I’ve called them Christmas ornaments there’s no reason why they couldn’t be on display all year-round!
To make some of your own you will need:
- Scrap fabric – you will need some white/light coloured fabric for the handprint side of the ornament, as well as brightly coloured scraps for the back. I used calico for the handprint side.
- Scanned image of handprint (or footprint)
- Iron-on T-shirt transfer paper (I used Avery T-Shirt Transfer Paper from Warehouse Stationery)
- Hobby fill
- Ribbon (I used 15cm lengths for each ornament)
- Basic sewing supplies (needle, thread, scissors, etc). You don’t need a sewing machine if you’re happy to hand-sew.
1. Print the handprints onto the T-Shirt Transfer paper, remembering to print as a mirror image. I was able to get 12 handprints onto one A4 sheet. Cut around each handprint.
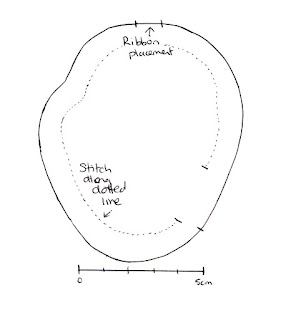
2. Make a pattern by drawing a very rough outline of the print, about 1.5 - 2 cm wider all around, this will give you a 1cm seam allowance and white space around the handprint. (The size will depend on the size of your baby’s handprint, the pattern I used for Mila’s handprint is included at the end of this tutorial, and includes markers for ribbon placement and seams.)
3. Using the pattern, cut out one piece from the light coloured fabric (with the template face up) and one piece out of brightly coloured fabric (with the template face down).
Iron the handprint onto the light coloured fabric, following the manufacturer’s direction.
4. Fold ribbon in half and pin to the right side of the back piece, with the ends of the ribbon at the centre top, and the ribbon hanging down (see photo below). Sew ribbon to back piece, sewing as close to the edge as possible (within the 1cm seam allowance).
5. Place back piece on top of front piece, right sides together, and sew around the edge leaving a 1.5cm - 2cm hole (you need to be able to fit your finger through the hole).
6. Turn the ornament right side out by reaching in through the hole and pulling out the ribbon (see photo below). Press (don’t iron directly onto the print).
7. Fill with hobby fill to the desired thickness and hand-sew the turning hole. Yay – you’re finished! The finished size will depend on how big your baby’s handprints are; my ornaments ended up being approximately 5cm x 6cm.
Pattern for Mila’s handprint ornament:


what a great way to remember her...x
ReplyDelete